AVISO 20/06/2018: esta entrada es solo válida para clonar sistemas con Ubuntu 14, no ha sido probada con sistemas posteriores y seguramente no funcionará.
Para ubuntu 18 tenemos
esta entrada.
En el
anterior post contabamos como instalar de forma permanente un sistema de clonacion basado en DRBL en un portátil sin usar un sistema live que arranque desde pendrive. Debido a que hice la documentación a posteriori y no quise extenderme demasiado en los detalles, el manual tenía muchas lagunas e imprecisiones sobre los que me han alertado varios compañeros (gracias Juan José, Juan Antonio y Sara por ser sufridores betatesters), para mas inri se hacían actualizaciones con puppet y pkgsync que deshacían parte de la configuración del DRBL.
Como esto no puede quedar así, toca intentar solucionar estos problemas explicando mejor todos los pasos y corrigiendo errores con esta versión remasterizada que será mas larga y heavy, pero que espero quede el proceso bien claro. Venga hey, ho, let's go.
Antes de nada: si quieres ir al grano, saltándonte ese rollo macabeo que cuento, y tener una imagen funcional de todo el sistema listo para cargar en un portatil que actuará como DRBL Server, vete al apartado 5. Para saber como hacer una clonación usando los scripts deberás leer el apartado 4.
Nuestro compañero Esteban nos enseñó y nos ha ampliado varias veces
como usar DRBL para realizar clonaciones multicast masivas de PC, de tal manera que nos hemos ahorrado mucho tiempo habiendo podido realizar de manera muy eficiente la preparación de portátiles de un curso para otro.
Aunque he usado muchas veces el sistema de arrancar DRBL desde un pendrive, realizar los pasos de la guía de Esteban y cargar las imágenes de los portátiles de 10 en 10, esta vez y por motivos que no vienen a cuento, pensé en modificar un sistema ya instalado en un portátil para meter los scripts DRBL dentro y clonar desde alli. Sin pendrives live ni nada. El resto del tiempo el portátil tendrá un uso normal y podré recurrir a él cada vez que tenga que hacer una clonación multicast.
La principal (y seguramente la única) ventaja es que toda la parte de la configuración del entorno DRBL solo tendría que hacerla una vez: en la instalación. Con DRBL live esto es una secuencia de pasos de configuración bastante pesada que tienes que hacer con cada nuevo arranque, en cambio en un sistema instalado solo los tendrias que hacer la primera vez y quedaría el entorno semiconfigurado.
Para ello me he guiado por
este enlace y
este otro, así como la página dedicada
a la instalación de DRBL, aparte (como no podría ser de otra forma) del
blog de Esteban.
Veamos la secuencia de pasos:
1) Sistema.
Partimos de un portátil ya funcional, esta vez un miniportátil MSI con Xubuntu 14.04 instalado. Tiene dos tarjetas de red: eth0 y wlan0, pero solo usaremos eth0 durante el proceso. Como DRBL necesita dos tarjetas de red para funcionar haremos un alias llamado eth0:0 sobre la tarjeta de red física.
2) Instalación del software.
Empezamos añadiendo el repositorio de DRBL en un fichero /etc/apt/sources.list.d/dbrl.list:
# cat /etc/apt/sources.list.d/dbrl.list
deb http://drbl.sourceforge.net/drbl-core drbl stable
Importamos la clave GPG y actualizamos los índices:
# wget http://drbl.sourceforge.net/GPG-KEY-DRBL
# apt-key add GPG-KEY-DRBL
# apt-get update
Instalamos el entorno DRBL y todas sus dependencias (en negrita pongo las preguntas y respuestas que suelo dar):
# apt-get install drbl
# /usr/sbin/drblsrv -i
*****************************************************.
Sugerencia: cuando una opción si/no (yes/no) esté disponible, el valor por defecto es la mayúscula, Ej. (y/N), por defecto es "N", cuando pulse "Intro", se usará "N". Si no está seguro de qué opción elegir, presione la tecla "Intro".
*****************************************************.
*****************************************************.
Instalando DRBL para Debian Linux...
*****************************************************.
¿Desea instalar las imágenes de inicio (boot) de red que permitan al cliente instalar alguna distribución GNU/Linux (Debian, Ubuntu, RedHat Linux, Fedora Core, Mandriva, CentOS and OpenSuSE...) a través de la red?  ///NOTA/// Esta acción descargará bastantes archivos (> 100 MB en total) de Internet, por lo que tardará algunos minutos. Si su máquina cliente posee disco duro y es posible instalar GNU/Linux en él, introduzca Y aquí. Si pone "no" aquí, puede ejecutar drbl-netinstall para instalarlos después.
[y/N] N
*****************************************************.
This GNU/Linux distribution uses one kernel to support SMP and non-SMP arch.
*****************************************************.
¿Desea usar la salida de consola serie para los clientes?
Si NO sabe nada sobre esto, introduzca "N" aquí, sino los clientes mostrarán NOTHING (NADA) en la pantalla !
[y/N] N
*****************************************************.
¿Qué arquitectura kernel de CPU quiere que asignar a los clientes DRBL?
0 -> i386 nivel CPU
1 -> i586 nivel CPU
2 -> Usar el mismo nivel de CPU con este servidor DRBL
¡Nota! ¡Nota ¡Nota!  ¡Nota!  ¡Nota!  ¡Nota!  Nota!
NOTA!!! Si su(s) máquina(s) cliente no son del mismo nivel que el servidor, por favor responda "0" ó "1", en caso contrario su(s) máquina(s) cliente NO iniciarán.
Si utiliza un nivel kernel de CPU incorrecto, los paquetes glibc y openssl usarán i686 o i386, el kernel usará i686, i586 o i386, lo cual puede no ser adecuado para sus equipos.
Si no está seguro, "1" es lo recomendado, esto todavía proporciona buenas prestaciones y compatibilidad.
[1] 1
*****************************************************.
The CPU arch option for your clients: 1
Para la distribución que está utilizando, sólo están disponibles i386 e i686, por lo que el nivel de optimización se ha cambiado de i586 to i386!!!
No hay optimización para su sistema, se usará el paquete "i386".
*****************************************************.
Limpiando la caché de apt para efectuar algunas configuraciones...
...
...
Como podemos observar, durante la ejecución de drblsrv -i responderemos a todas las preguntas que nos hagan con la opción por defecto (la señalada en mayúsculas).
Todas las dependencias están ya dentro del mismo paquete, así que con eso tenemos el entorno instalado y podemos pasar a configurarlo.
Antes de continuar, subrayar que si tenemos pkgsync en el sistema no debemos olvidar añadir en el /etc/pkgsync/mayhave o /etc/pkgsync/mayhave.d/... todos los paquetes instalados por el drblsrv, que son:
drbl
cryptsetup
cryptsetup-bin
discover-data
kpartx-boot
libcryptsetup4
libdevmapper-event1.02.1
libdiscover2
libdmraid1.0.0.rc16
libecryptfs0
libgetopt-argvfile-perl
libslp1
libyaml-syck-perl
netcat-traditional
watershed
opencryptoki
zescrow-client
hfsutils-tcltk
isc-dhcp-server-ldap
xorriso
slpd
openslp-doc
thin-provisioning-tools
lziprecover
libcrypt-passwdmd5-perl
perl-doc
aoetools
btrfs-tools
clonezilla
cryptsetup
cryptsetup-bin
discover
discover-data
disktype
dmraid
dos2unix
drbl-chntpw
ecryptfs-utils
etherwake
expect
freedos
grub-efi-ia32-bin
hfsprogs
hfsutils
ipxe
isc-dhcp-server
isolinux
kpartx
kpartx-boot
lbzip2
lftp
libcryptsetup4
libdevmapper-event1.02.1
libdiscover2
libdmraid1.0.0.rc16
libecryptfs0
libgetopt-argvfile-perl
libslp1
libyaml-syck-perl
lrzip
lvm2
lzip
lzma
lzop
mkpxeinitrd-net
netcat
netcat-traditional
nfs-kernel-server
nis
partclone
partimage
pbzip2
pigz
pixz
plzip
pv
pxelinux
pxz
reiserfsprogs
sdparm
ssh
syslinux-efi
syslinux-utils
tftpd-hpa
tofrodos
traceroute
txt2html
udpcast
watershed
La instalación deja un directorio /tftpboot con el entorno básico de arranque PXE al que luego se añadirán otras cosas. Como en mi caso el directorio /tftpboot está en la partición raíz y allí apenas había espacio para meter todo lo que hace falta para el entorno completo, es mas adecuado para mí ponerlo dentro de /home, que está en otra partición donde hay espacio de sobra. Lo que haré será mover /tftpboot y su contenido a home y crear luego un enlace directo en la raíz:
# mv /tftpboot /home/tftpboot
# ln -sf /home/tftpboot /tftpboot
3) Configuración del entorno DRBL:
Aquí tenemos 2 opciones:
3.a) Configuración desde cero.
El entorno desde cero se configura con "dbrlpush -i". Antes de hacerlo debemos configurar a mano las tarjetas de red que usaremos con las IP que tendrán para el proceso. Queremos que la red quede:
+-- [eth0] 192.168.1.1 +- a WAN
+-- [eth0:0] 192.168.100.254 +- al grupo de clientes, 20 con ip 192.168.100.200 - 192.168.100.219
Será eth0:0 la tarjeta por la que se darán las IP y las imágenes para los clientes y eth0 tendrá una IP que en teoría sirve para conectarnos hacia fuera, pero que en la práctica está de adorno. Es un poco absurdo, pero así es la arquitectura de DRBL. Las IPs usadas no tienen nada especial, necesitaba dos rangos y he elegido 192.168.1.X y 192.168.100.X de forma arbitraria. Tecleamos por tanto:
# ifconfig eth0 up
# ifconfig eth0 192.168.1.1 netmask 255.255.255.0
# ifconfig eth0:0 up
# ifconfig eth0:0 192.168.100.254 netmask 255.255.255.0
# drblpush -i
Esto nos hará una serie de preguntas bastante desesperantes y raras que debemos responder. Muchas de estas preguntas se hacen porque DBRL es muy configurable, aunque luego siempre lo usemos de igual manera. Si se quiere ver un ejemplo de configuración aquí lo tenemos a modo de guía (en negrita marco las partes interactivas con las respuestas, que casi siempre son la opción por defecto):
# drblpush -i
******************************************************
Hint! When a yes/no option is available, the default value is uppercase, Ex. (y/N), the default is "N", when you press "Enter", it will use "N". If you are not sure which one to choose, you can just press "Enter" key.
******************************************************
Searching the installed packages for DRBL server...This might take several minutes...
Finished searching the installed packages for DRBL server.
******************************************************
------------------------------------------------------
The interactive mode let you supply the information of your DRBL environment.
------------------------------------------------------
------------------------------------------------------
Please enter DNS domain (such as drbl.sf.net):
[drbl.org]
Set DOMAIN as drbl.org
------------------------------------------------------
Please enter NIS/YP domain name:
[penguinzilla]
Set DOMAIN as penguinzilla
------------------------------------------------------
Please enter the client hostname prefix:
This prefix is used to automatically create hostname for clients. If you want to overwrite some or all automatically created hostnames, press Ctrl-C to quit this program now, edit /etc/drbl/client-ip-hostname, then run this program again.
[precise32] linex-
Set the client hostname prefix as linex-
------------------------------------------------------
eth0: IP address 192.168.1.1, netmask 255.255.255.0
eth0:0: IP address 192.168.100.254, netmask 255.255.255.0
Configured ethernet card(s) found in your system: eth0 eth0:0
------------------------------------------------------
The public IP address of this server is NOT found.
Which ethernet port in this server is for public Internet accsess, not for DRBL connection?
Available ethernet ports in this server:
eth0 (192.168.1.1), eth0:0 (192.168.100.254),
[eth0]
The ethernet port you choose for the WAN connection: eth0
The ethernet port(s) for DRBL environment:  eth0:0
******************************************************
******************************************************
Now we can collect the MAC address of clients!
If you want to let the DHCP service in DRBL server offer same IP address to client every time when client boot, and you never did this procedure, you should do it now!
If you already have those MAC addresses of clients, you can put them into different group files (These files number is the same number of networks cards for DRBL service). In this case, you can skip this step.
This step helps you to record the MAC addresses of clients, then divide them into different groups. It will save your time and reduce the typos.
The MAC addresses will be recorded turn by turn according to the boot of clients,
and they will be put into different files according to the network card in server, file name will be like macadr-eth1.txt, macadr-eth2.txt... You can find them in directory /etc/drbl.
Please boot the clients by order, make sure they boot from etherboot or PXE!
Do you want to collect them?
[y/N]
******************************************************
OK! Let's continue...
******************************************************
Do you want to let the DHCP service in DRBL server offer same IP address to the client every time when client boots (If you want this function, you have to collect the MAC addresses of clients, and save them in file(s) (as in the previous procedure)). This is for the clients connected to DRBL server's ethernet network interface eth0 ?
[y/N]
******************************************************
OK! Let's continue, we will set the IP address of clients by "first boot gets IP first" instead of fixed one!
Hostmin: 192.168.1.1
******************************************************
What is the initial number do you want to use in the last set of digits in the IP (i.e. the initial value of d in the IP address a.b.c.d) for DRBL clients connected to this ethernet port eth0:0.
[1] 200
******************************************************
How many DRBL clients (PC for students) connected to DRBL server's ethernet network interface eth0:0 ?
Please enter the number:
[12] 20
******************************************************
The final number in the last set of digits in the client's IP address is "20".
We will set the IP address for the clients connected to DRBL server's ethernet network interface eth0:0 as: 192.168.100.200 - 192.168.100.219
Accept ? [Y/n]
******************************************************
OK! Let's continue...
******************************************************
The Layout for your DRBL environment:
******************************************************
          NIC    NIC IP                    Clients
+-----------------------------+
|         DRBL SERVER         |
|                             |
|    +-- [eth0] 192.168.1.1 +- to WAN
|                             |
|    +-- [eth0:0] 192.168.100.254 +- to clients group 1 [ 20 clients, their IP
|                             |            from 192.168.100.200 - 192.168.100.219]
+-----------------------------+
******************************************************
Total clients: 20
******************************************************
Press Enter to continue...
******************************************************
------------------------------------------------------
In the system, there are 3 modes for diskless linux services:
[0] Full DRBL mode, every client has its own NFS based /etc and /var.
[1] DRBL SSI (Single system image) mode, every client uses tmpfs based /etc and /var. In this mode, the loading and necessary disk space of server will be lighter. NOTE! (a) The client machine memory is recommended at least 256 MB. (b) The setting and config files of client will not be saved to the DRBL server! They are just used once and will vanish after the machine shutdowns! Besides, if you modify any file in the template client (located in /tftpboot/nodes), you have to run drbl-gen-ssi-files to create the template tarball in /tftpboot/node_root/drbl_ssi/. (c) If you want to provide some file to overwrite the setting in the template tarball when client boots, check /tftpboot/node_root/drbl_ssi/clients/00_README for more details.
[2] I do NOT want to provide diskless Linux service to client.
Which mode do you prefer?
[0]
Full DRBL mode is chosen!
******************************************************
------------------------------------------------------
In the system, there are 4 modes available for clonezilla:
[0] Full Clonezilla mode, every client has its own NFS based /etc and /var.
[1] Clonezilla box mode, every client uses tmpfs based /etc and /var. In this mode, the loading and necessary disk space of server will be lighter than that in Full Clonezilla mode. Note! In Clonezilla box mode, the setting and config files of client will not be saved to the DRBL server! They just use once and will vanish after the machine shutdowns!
[2] I do NOT want clonezilla.
[3] Use Clonezilla live as the OS (Operating System) of clients (Testing).
Which mode do you prefer?
[0]
Full clonezilla mode is set!
******************************************************
******************************************************
The CPU arch for clients when running Clonezilla job: i386
------------------------------------------------------
When using clonezilla, which directory in this server you want to store the saved image (Please use absolute path, and do NOT assign it under /mnt/, /media/ or /tmp/)?
[/home/partimag]
Directory for clonezilla saved images: /home/partimag
------------------------------------------------------
If there is a local harddrive with swap partition or writable file system in your client machine,
do you want to use that swap partition or create a swap file in  the writable filesystem so that client has more memory to use? (This step will NOT destroy any data in that harddisk)
[Y/n]
******************************************************
OK! We will try to create a swap space for your client if it has a local hard drive!
------------------------------------------------------
What's the maximun size (Megabytes) for the swap space?
We will try to allocate the swap space for you, if it's not enough, 60% of the free space will be used.
[128]
maxswapsize=128
******************************************************
------------------------------------------------------
Which mode do you want the clients to use after they boot?
"1": Graphic mode (X window system) (default),
"2": Text mode.
[1]
The clients will enter graphic mode after booting.
******************************************************
------------------------------------------------------
Which mode do you want when client boots in graphic mode?
0: normal login, 1: auto login, 2: timed login
[0]
The clients will wait for user to login when they boot.
******************************************************
------------------------------------------------------
Do you want to set the root's password for clients instead of using same root's password copied from server? (For better security)
[y/N]
OK! Let's continue...
------------------------------------------------------
Do you want to set the pxelinux password for clients so that when client boots, a password must be entered to startup (For better security)
[y/N]
OK! Let's continue...
------------------------------------------------------
Do you want to set the boot prompt for clients?
[Y/n]
How many 1/10 sec is the boot prompt timeout for clients?
[70]
OK! Let's continue...
------------------------------------------------------
------------------------------------------------------
Do you want to use graphic background for PXE menu when client boots?
Note! If you use graphical PXELinux menu, however client fails to boot, you can switch to text mode by running "switch-pxe-bg-mode -m text".
[Y/n]
Use graphic PXE Linux menu for the client.
------------------------------------------------------
------------------------------------------------------
Do you want to let audio, cdrom, floppy, video and plugdev (like USB device) open to all users in the DRBL client? If yes, we will add all the users to those device groups in the server and client.
[Y/n]
OK! Let's continue...
------------------------------------------------------
------------------------------------------------------
By using alias interface, every client can have 2 IPs,
one of them is private IP for clients connected to DRBL server, and the other is public IP for clients directly connected to WAN from switch!
Do you want to setup public IP for clients?
[y/N]
------------------------------------------------------
Do you want to let DRBL clients have an option to run terminal mode? i.e. you want to let that client run remote display (which will mostly use resources of server), say "Y" here.
Note!
0. If you say yes to this option, this will be a very limited environment for client, i.e. NO local access for USB, CD, audio, printer, etc. in client.
1. If your server is not powerful, say "no" here.
2. By saying "yes" here, we will turn on xdmcp,
It is never a safe thing to turn on that.  Setting up /etc/hosts.allow and /etc/hosts.deny to only allow local access is another alternative but not the safest.
Firewalling port 177 is the safest if you wish to have xdmcp on.
Read the manual for more notes on the security of XDMCP.
Please set it by yourself!
3. If you say "yes" here, you might have to restart your desktop environment manager (gdm/kdm) later, remember to save your data before you close applications!
Do you want to let client has an option to run terminal mode?
[y/N]
OK! Let's continue...
------------------------------------------------------
------------------------------------------------------
Do you want to let DRBL server as a NAT server? If not, your DRBL client will NOT be able to access Internat.
[Y/n]
OK! Let's continue...
------------------------------------------------------
******************************************************
The running kernel in the server supports NFS over TCP!
Note! If you change the running kernel in the server, and not sure whether the kernel supports NFS over udp or tcp, you'd better to re-run "drblpush -i" again to avoid the client boots in failure!
Press Enter to continue...
------------------------------------------------------
******************************************************
The calculated NETWORK for eth0:0 is 192.168.100.0.
******************************************************
******************************************************
We are now ready to deploy the files to system!
Do you want to continue?
Warning! If you go on, your firewall rules will be overwritten during the setup!
The original rules will be backuped as iptables.drblsave in system config directory (/etc/sysconfig or /etc/default).
[Y/n]
******************************************************
OK! Let's do it!
------------------------------------------------------
Some files are found in /usr/share/drbl//prerun/drbl/. Run them first...
Checking the necessary disk space... done!
Copying the config file to /etc/drbl... done!
Backup the original /etc/hosts as /etc/hosts.drblsave... done!
Generate the /etc/hosts for clients connected to eth0:0... done!
Cleaning the stale files of the diskless nodes if they exist... done!
*****************************************************.
*****************************************************.
The version number for your GNU/Linux: DBN-TU
Keeping the old common root files if they exist...
Keeping old nodes if they exist...
Creating common root files... This might take several minutes........... done!
Update the kernel for client if necessary...
The DRBL client uses i686 kernel with version 3.2.0-53-generic-pae...
Trying to update the /tftpboot/node_root/lib/modules/3.2.0-53-generic-pae from server's /lib/modules/... This might take several minutes...
Found kernel modules in /lib/modules/3.2.0-53-generic-pae and its arch "i686" matches client's "i686"...
Syncing /lib/modules/3.2.0-53-generic-pae to client's common root...
Syncing /boot/*-3.2.0-53-generic-pae* to client's common root...
Generating the /tftpboot/node_root/lib/modules/3.2.0-53-generic-pae/modules.dep
Syncing /lib/firmware/ to client's common root...
Copying the directory /etc/ to clients common root /tftpboot/node_root...
Cleaning the ssh key file ssh_host_dsa_key copied from server... done!
Cleaning the ssh key file ssh_host_dsa_key.pub copied from server... done!
Cleaning the ssh key file ssh_host_rsa_key copied from server... done!
Cleaning the ssh key file ssh_host_rsa_key.pub copied from server... done!
Commenting the TCPwrapper related file /tftpboot/node_root/etc/hosts.deny copied from server... done!
Commenting the TCPwrapper related file /tftpboot/node_root/etc/hosts.allow copied from server... done!
Found udevd rule causes block devices with LVM signatures to be automatically added to their volume group.
Temporarily disable it otherwise the partition tool won't be able to inform the kernel the changes of partition table...
`/tftpboot/node_root/lib/udev/rules.d/85-lvm2.rules' -> `/tftpboot/node_root/lib/udev/rules.d/85-lvm2.rules.drblsave'
The startup services for DRBL client are:
firstboot portmap ypbind ssh dbus acpid acpi-support cups drblthincli mkswapfile arm-wol sendsigs umountfs
Using udev for clients... Set graphic mode for Debian DRBL client...
Deleting the accounts (except root) in the clients common root template... done!
Enabling the NIS client in the common root template... done!
Creating some necessary files in the clients common root template.....rsync: readlink_stat("/var/lib/lightdm/.gvfs") failed: Permission denied (13)
rsync error: some files/attrs were not transferred (see previous errors) (code 23) at main.c(1070) [sender=3.0.9]
. done!
Creating DRBL client: linex-101 192.168.100.200... Generating SSH host keys for client 192.168.100.200 if they do not exist... done!
Display manager:"lightdm"...
Setting node 192.168.100.200 as normal_login... done!
Creating DRBL client: linex-102 192.168.100.201... Generating SSH host keys for client 192.168.100.201 if they do not exist... done!
Display manager:"lightdm"...
Setting node 192.168.100.201 as normal_login... done!
Creating DRBL client: linex-103 192.168.100.202... Generating SSH host keys for client 192.168.100.202 if they do not exist... done!
Display manager:"lightdm"...
Setting node 192.168.100.202 as normal_login... done!
Creating DRBL client: linex-104 192.168.100.203... Generating SSH host keys for client 192.168.100.203 if they do not exist... done!
Display manager:"lightdm"...
Setting node 192.168.100.203 as normal_login... done!
Creating DRBL client: linex-105 192.168.100.204... Generating SSH host keys for client 192.168.100.204 if they do not exist... done!
Display manager:"lightdm"...
Setting node 192.168.100.204 as normal_login... done!
......
......
Creating DRBL client: linex-120 192.168.100.219... Generating SSH host keys for client 192.168.100.219 if they do not exist... done!
Display manager:"lightdm"...
Setting node 192.168.100.219 as normal_login... done!

Modifying option diskless_client_os in drbl-ocs.conf...
Disable the password in pxelinux simple menu for all clients...
Disabling PXE password in config file /tftpboot/nbi_img/pxelinux.cfg/default...
done!
Now add necessary services to this DRBL server: DHCP, TFTP, NFS, NIS...
Generating the NFS exports for DRBL clients...
Backup the original /etc/exports as /etc/exports.drblsave
Exporting to clients by IP address line-by-line...
Full DRBL or Full Clonezilla mode, exporting client's directories etc, var, root...
The /etc/exports setting is ok now!
Now generate the firewall rules for NAT service...
Stop the NAT service first...
Now stop the NAT service...
Flushing firewall rules: success
ip_forward is already on.
Now set the YP securenets...
Backup the original /etc/ypserv.securenets as /etc/ypserv.securenets.drblsave
The /etc/ypserv.securenets setting is done!
Update YP...
Now add the service:  portmap ypserv ypbind yppasswdd ypxfrd isc-dhcp-server nfs-kernel-server tftpd-hpa drbl-clients-nat
Force to add portmap service in this Debian DRBL server...
Force to add ypserv service in this Debian DRBL server...
Force to add ypbind service in this Debian DRBL server...
Force to add yppasswdd service in this Debian DRBL server...
Force to add ypxfrd service in this Debian DRBL server...
Force to add isc-dhcp-server service in this Debian DRBL server...
Force to add nfs-kernel-server service in this Debian DRBL server...
Force to add tftpd-hpa service in this Debian DRBL server...
Force to add drbl-clients-nat service in this Debian DRBL server...
Now start the service:  portmap ypserv ypbind yppasswdd ypxfrd isc-dhcp-server nfs-kernel-server tftpd-hpa drbl-clients-nat
initctl: Unknown instance:
portmap start/running, process 9284
ypserv stop/waiting
ypserv start/running, process 9336
ypbind stop/waiting
ypbind start/running, process 9366
yppasswdd stop/waiting
yppasswdd start/running, process 9384
ypxfrd stop/waiting
ypxfrd start/running, process 9395
initctl: Unknown instance:
isc-dhcp-server start/running, process 9405
 * Stopping NFS kernel daemon
   ...done.
 * Unexporting directories for NFS kernel daemon...
   ...done.
 * Exporting directories for NFS kernel daemon...
   ...done.
 * Starting NFS kernel daemon
   ...done.
tftpd-hpa stop/waiting
tftpd-hpa start/running, process 9466
Stopping the NAT services for DRBL clients... Now stop the NAT service...
Flushing firewall rules: success
done!
Starting the NAT services for DRBL clients... done!
ip_forward is already on.
The GDM or KDM config file is NOT found! Skip setting the DM! Maybe you will not be able to make this DRBL server as thin client server!
Clean all the previous saved config file if they exist...done!
Turn on the boot prompt for PXE client...done!
Turn off the thin client option in PXE boot menu...done!
Modifying /tftpboot/nbi_img/pxelinux.cfg/default to let DRBL client use graphical PXE boot menu... done!
Full DRBL mode. Remove clientdir opt for label drbl in pxelinux config...
Setting drbl_mode="full_drbl_mode" in /etc/drbl/drbl_deploy.conf and /etc/drbl/drblpush.conf... done!
Full clonezilla mode. Remove clientdir opt for label clonezilla in pxelinux config...
Setting clonezilla_mode="full_clonezilla_mode" in /etc/drbl/drbl_deploy.conf and /etc/drbl/drblpush.conf... done!
You have to use "dcs" -> clonezilla-start to start Clonezilla service, so that there will be a Clonezilla menu when client boots
*****************************************************.
Adding normal users to group "dialout audio cdrom plugdev floppy video"......... done!
*****************************************************.
Updating the YP/NIS for group...
Note! If you add new or remove accounts in the DRBL server in the future, remember to run the following command again, so that some group (EX:plugdev) will be updated:
tune-debian-dev-group-perm -g "dialout audio cdrom plugdev floppy video" -e
Some files are found in /usr/share/drbl//postrun/drbl/. Run them now...
*****************************************************.
Enjoy DRBL!!!
http://drbl.org; http://drbl.nchc.org.tw
NCHC Free Software Labs, Taiwan. http://free.nchc.org.tw
*****************************************************.
If you like, you can reboot the DRBL server now to make sure everything is ready...(This is not necessary, just an option)
*****************************************************.
The DRBL server is ready! Now set the client machines to boot from PXE. (refer to http://drbl.sourceforge.net for more details)
P.S. The config file is saved as /etc/drbl/drblpush.conf. Therefore if you want to run drblpush with the same config again, you may run it as: drblpush -c /etc/drbl/drblpush.conf
Todo esto anterior sólo debe seguirse en líneas generales, ya que quizá haya que adaptarlo un poco. Por tanto si seguimos esta vía 3a debemos tener muy claras las características de nuestro caso concreto y responder cuidadosamente a todas las preguntas.
3.b) Reutilizando una configuración ya hecha.
Como se muestra al final del anterior listado, la configuración generada por drblpush se guarda en /etc/drbl/drblpush.conf y podemos reutilizarla en otra ocasión o moverla de una máquina a otra usando el parámetro "-c". En mi caso, tras hacer la configuración a mano contando con dos tarjetas de red que serán eth0 (con ip 192.168.1.1/24) y eth0:0 (con ip 192.168.100.254/24) el fichero queda:
# cat /etc/drbl/drblpush.conf
#Setup for general
[general]
domain=drbl.org
nisdomain=penguinzilla
localswapfile=yes
client_init=graphic
login_gdm_opt=login
timed_login_time=
maxswapsize=128
ocs_img_repo_dir=/home/partimag
total_client_no=20
create_account=
account_passwd_length=8
hostname=linex-
purge_client=no
client_autologin_passwd=
client_root_passwd=
client_pxelinux_passwd=
set_client_system_select=yes
use_graphic_pxelinux_menu=yes
set_DBN_client_audio_plugdev=yes
open_thin_client_option=no
client_system_boot_timeout=5
language=es_ES.UTF-8
set_client_public_ip_opt=no
config_file=drblpush.conf
collect_mac=no
run_drbl_ocs_live_prep=yes
drbl_ocs_live_server=
clonezilla_mode=full_clonezilla_mode
live_client_branch=alternative
live_client_cpu_mode=i386
drbl_mode=full_drbl_mode
drbl_server_as_NAT_server=no
add_start_drbl_services_after_cfg=yes
continue_with_one_port=

#Setup for eth0:0
[eth0:0]
interface=eth0:0
range=200-219
Nótese en "total_client_no" y "range" que he puesto un rango de 20 ip (se darán IP por DHCP en el rango 192.168.100.200-219). Nunca voy a clonar mas de 20 PC a la vez, pero ese parámetro podemos variarlo en función de nuestras necesidades.
Por tanto, si queremos optar por la via sencilla y configurar el entorno sin complicarnos con un montón de preguntas extrañas, creamos el fichero /etc/drbl/drblpush.conf con el contenido antes referido y lo importamos tal como nos dijeron:
# drblpush -c /etc/drbl/drblpush.conf
Con lo cual tenemos un lindo y enigmático error:
Error! NFSSERVER is unset!
Please set nfsserver in config file "drblpush-blog.conf" or IPADDR in system config file
Después de quebrarme el coco un rato y probar cosas veo que la causa es que el alias eth0:0 no está creado al llamar a dbrlpush y el fichero dbrlpush.conf hace referencia a él. Hay que crear y configurar ese alias antes de lanzar el dbrlpush. Ahora mostramos la lista de comandos a teclear y lo que me sale al hacer el dbrlpush (de nuevo en negrita la parte interactiva):
# ifconfig eth0:0 up
SIOCSIFFLAGS: No se puede asignar la dirección solicitada
# ifconfig eth0:0 192.168.100.254 netmask 255.255.255.0
# ifconfig eth0:0
eth0:0 Link encap:Ethernet  direcciónHW 40:61:86:b7:28:f1
       Direc. inet:192.168.100.254  Difus.:192.168.100.255  Másc:255.255.255.0
       ACTIVO DIFUSIÓN FUNCIONANDO MULTICAST  MTU:1500  Métrica:1

# drblpush -c /etc/drbl/drblpush.conf
******************************************************
Sugerencia! Cuando una opción si/no esté disponible, el valor por defecto es la mayuscula, Ej. (y/N), el valor por defecto es "N", cuando pulse "Intro", se usará "N". Si no está seguro de qué elegir, pulse la tecla "Intro" key.
******************************************************
Buscando los paquetes instalados del servidor DRBL... Esto puede tardar varios minutos...
Terminó la búsqueda de los paquetes instalados del servidor DRBL.
******************************************************
El kernel del servidor soporta NFS over TCP!
Nota! Si cambia el kernel actual del servidor, y no está seguro de que el nuevo no soporte NFS bajo udp o tcp, será mejor que re-ejecute "drblpush -i" otra vez para evitar fallos en el inicio de los clientes!
Pulse Intro para continuar...
------------------------------------------------------
******************************************************
The calculated NETWORK for eth0:0 is 192.168.100.0.
******************************************************
******************************************************
Arora se pueden poner los archivos a disposición del sistema!
Desea continuar ?
Atención! Si continua, las reglas de su firewall se sobrescribirán durante la configuración!
Las reglas originales serán guardadas como iptables.drblsave en el directorio de configuración de sistema (/etc/sysconfig o /etc/default).
[Y/n] Y
******************************************************
OK! Hagámoslo!
------------------------------------------------------
Some files are found in /usr/share/drbl//prerun/drbl/. Run them first...
Checking the necessary disk space... done!
Copying the config file to /etc/drbl... done!
Backup the original /etc/hosts as /etc/hosts.drblsave... done!
Generate the /etc/hosts...
done!
Cleaning the stale files of the diskless nodes if they exist... done!
*****************************************************.
*****************************************************.
The version number for your GNU/Linux: DBN-TU
Keeping the old common root files if they exist...
Keeping old nodes if they exist...
Creating common root files... This might take several minutes...........Copying normal dir /lib32 to /tftpboot/node_root/...Copying normal dir /lib64 to /tftpboot/node_root/... done!
Update the kernel for client if necessary...
The DRBL client uses x86_64 kernel with version 3.19.0-73-generic...
Trying to update the /tftpboot/node_root/lib/modules/3.19.0-73-generic from server's /lib/modules/... This might take several minutes...
Found kernel modules in /lib/modules/3.19.0-73-generic and its arch "x86_64" matches client's "x86_64"...
Syncing /lib/modules/3.19.0-73-generic to client's common root...
Syncing /boot/*-3.19.0-73-generic* to client's common root...
Generating the /tftpboot/node_root/lib/modules/3.19.0-73-generic/modules.dep
Syncing /lib/firmware/ to client's common root...
Copying the directory /etc/ to clients common root /tftpboot/node_root...
Cleaning the ssh key file ssh_host_dsa_key copied from server... done!
Cleaning the ssh key file ssh_host_dsa_key.pub copied from server... done!
Cleaning the ssh key file ssh_host_rsa_key copied from server... done!
Cleaning the ssh key file ssh_host_rsa_key.pub copied from server... done!
Commenting the TCPwrapper related file /tftpboot/node_root/etc/hosts.deny copied from server... done!
Commenting the TCPwrapper related file /tftpboot/node_root/etc/hosts.allow copied from server... done!
Found udevd rule causes block devices with LVM signatures to be automatically added to their volume group.
Temporarily disable it otherwise the partition tool won't be able to inform the kernel the changes of partition table...
'/tftpboot/node_root/lib/udev/rules.d/85-lvm2.rules' -> '/tftpboot/node_root/lib/udev/rules.d/85-lvm2.rules.drblsave'
The startup services for DRBL client are:
firstboot rpcbind ssh dbus acpid cups binfmt-support drblthincli mkswapfile arm-wol sendsigs umountfs
Using udev for clients... Set graphic mode for Debian DRBL client...
Deleting the accounts (except root) in the clients common root template... done!
Enabling the NIS client in the common root template... done!
Creating some necessary files in the clients common root template...... done!
Creating DRBL client: linex-192-168-100-200 192.168.100.200... Generating SSH host keys for client 192.168.100.200 if they do not exist... done!
Display manager:"lightdm"...
Setting node 192.168.100.200 as normal_login... done!
Creating DRBL client: linex-192-168-100-201 192.168.100.201... Generating SSH host keys for client 192.168.100.201 if they do not exist... done!
Display manager:"lightdm"...
Setting node 192.168.100.201 as normal_login... done!
Creating DRBL client: linex-192-168-100-202 192.168.100.202... Generating SSH host keys for client 192.168.100.202 if they do not exist... done!
Display manager:"lightdm"...
Setting node 192.168.100.202 as normal_login... done!
Creating DRBL client: linex-192-168-100-203 192.168.100.203... Generating SSH host keys for client 192.168.100.203 if they do not exist... done!
Display manager:"lightdm"...
Setting node 192.168.100.203 as normal_login... done!
Creating DRBL client: linex-192-168-100-204 192.168.100.204... Generating SSH host keys for client 192.168.100.204 if they do not exist... done!
Display manager:"lightdm"...
Setting node 192.168.100.204 as normal_login... done!
Creating DRBL client: linex-192-168-100-205 192.168.100.205... Generating SSH host keys for client 192.168.100.205 if they do not exist... done!
Display manager:"lightdm"...
Setting node 192.168.100.205 as normal_login... done!
Creating DRBL client: linex-192-168-100-206 192.168.100.206... Generating SSH host keys for client 192.168.100.206 if they do not exist... done!
Display manager:"lightdm"...
Setting node 192.168.100.206 as normal_login... done!
Creating DRBL client: linex-192-168-100-207 192.168.100.207... Generating SSH host keys for client 192.168.100.207 if they do not exist... done!
Display manager:"lightdm"...
Setting node 192.168.100.207 as normal_login... done!
Creating DRBL client: linex-192-168-100-208 192.168.100.208... Generating SSH host keys for client 192.168.100.208 if they do not exist... done!
Display manager:"lightdm"...
Setting node 192.168.100.208 as normal_login... done!
Creating DRBL client: linex-192-168-100-209 192.168.100.209... Generating SSH host keys for client 192.168.100.209 if they do not exist... done!
Display manager:"lightdm"...
Setting node 192.168.100.209 as normal_login... done!
Creating DRBL client: linex-192-168-100-210 192.168.100.210... Generating SSH host keys for client 192.168.100.210 if they do not exist... done!
Display manager:"lightdm"...
Setting node 192.168.100.210 as normal_login... done!
Creating DRBL client: linex-192-168-100-211 192.168.100.211... Generating SSH host keys for client 192.168.100.211 if they do not exist... done!
Display manager:"lightdm"...
Setting node 192.168.100.211 as normal_login... done!
Creating DRBL client: linex-192-168-100-212 192.168.100.212... Generating SSH host keys for client 192.168.100.212 if they do not exist... done!
Display manager:"lightdm"...
Setting node 192.168.100.212 as normal_login... done!
Creating DRBL client: linex-192-168-100-213 192.168.100.213... Generating SSH host keys for client 192.168.100.213 if they do not exist... done!
Display manager:"lightdm"...
Setting node 192.168.100.213 as normal_login... done!
Creating DRBL client: linex-192-168-100-214 192.168.100.214... Generating SSH host keys for client 192.168.100.214 if they do not exist... done!
Display manager:"lightdm"...
Setting node 192.168.100.214 as normal_login... done!
Creating DRBL client: linex-192-168-100-215 192.168.100.215... Generating SSH host keys for client 192.168.100.215 if they do not exist... done!
Display manager:"lightdm"...
Setting node 192.168.100.215 as normal_login... done!
Creating DRBL client: linex-192-168-100-216 192.168.100.216... Generating SSH host keys for client 192.168.100.216 if they do not exist... done!
Display manager:"lightdm"...
Setting node 192.168.100.216 as normal_login... done!
Creating DRBL client: linex-192-168-100-217 192.168.100.217... Generating SSH host keys for client 192.168.100.217 if they do not exist... done!
Display manager:"lightdm"...
Setting node 192.168.100.217 as normal_login... done!
Creating DRBL client: linex-192-168-100-218 192.168.100.218... Generating SSH host keys for client 192.168.100.218 if they do not exist... done!
Display manager:"lightdm"...
Setting node 192.168.100.218 as normal_login... done!
Creating DRBL client: linex-192-168-100-219 192.168.100.219... Generating SSH host keys for client 192.168.100.219 if they do not exist... done!
Display manager:"lightdm"...
Setting node 192.168.100.219 as normal_login... done!
Modifying option diskless_client_os in drbl-ocs.conf...
Disable the password in pxelinux simple menu for all clients...
Disabling PXE password in config file /tftpboot/nbi_img/pxelinux.cfg/default...
done!
Now add necessary services to this DRBL server: DHCP, TFTP, NFS, NIS...
Generating the NFS exports for DRBL clients...
Backup the original /etc/exports as /etc/exports.drblsave
Exporting to clients by IP address line-by-line...
Full DRBL or Full Clonezilla mode, exporting client's directories etc, var, root...
The /etc/exports setting is ok now!
Este servidor DRBL NO proporcionar servicio NAT, por tanto su cliente DRBL NO podrá acceder al Internet.
Now stop the NAT service...
Now set the YP securenets...
Backup the original /etc/ypserv.securenets as /etc/ypserv.securenets.drblsave
The /etc/ypserv.securenets setting is done!
Update YP...
Now add the service:  isc-dhcp-server rpcbind ypserv ypbind yppasswdd ypxfrd statd nfs-kernel-server tftpd-hpa drbl-clients-nat
Force to add isc-dhcp-server service in this Debian DRBL server...
Force to add rpcbind service in this Debian DRBL server...
Force to add ypserv service in this Debian DRBL server...
Force to add ypbind service in this Debian DRBL server...
Force to add yppasswdd service in this Debian DRBL server...
Force to add ypxfrd service in this Debian DRBL server...
Force to add statd service in this Debian DRBL server...
Force to add nfs-kernel-server service in this Debian DRBL server...
Force to add tftpd-hpa service in this Debian DRBL server...
Force to add drbl-clients-nat service in this Debian DRBL server...
Now start the service:  isc-dhcp-server rpcbind ypserv ypbind yppasswdd ypxfrd statd nfs-kernel-server tftpd-hpa drbl-clients-nat
isc-dhcp-server stop/waiting
isc-dhcp-server start/running, process 20579
rpcbind stop/waiting
rpcbind start/running, process 20603
ypserv stop/waiting
ypserv start/running, process 20673
ypbind stop/waiting
ypbind start/running, process 20717
yppasswdd stop/waiting
yppasswdd start/running, process 20737
ypxfrd stop/waiting
ypxfrd start/running, process 20754
statd stop/waiting
statd start/running, process 20767
 * Stopping NFS kernel daemon                                                                                                                                                                                                                                        [ OK ]
 * Unexporting directories for NFS kernel daemon...                                                                                                                                                                                                                  [ OK ]
 * Exporting directories for NFS kernel daemon...                                                                                                                                                                                                                    [ OK ]
 * Starting NFS kernel daemon                                                                                                                                                                                                                                        [ OK ]
tftpd-hpa stop/waiting
tftpd-hpa start/running, process 20929
Stopping the NAT services for DRBL clients... Now stop the NAT service...
done!
Starting the NAT services for DRBL clients... done!
ip_forward is already on.
The GDM or KDM config file is NOT found! Skip setting the DM! Maybe you will not be able to make this DRBL server as thin client server!
Clean all the previous saved config file if they exist...done!
Turn on the boot prompt for PXE client...done!
Turn off the thin client option in PXE boot menu...done!
Modifying /tftpboot/nbi_img/pxelinux.cfg/default to let DRBL client use graphical PXE boot menu... done!
Full DRBL mode. Remove clientdir opt for label drbl in pxelinux config...
Setting drbl_mode="full_drbl_mode" in /etc/drbl/drbl_deploy.conf and /etc/drbl/drblpush.conf... done!
Full clonezilla mode. Remove clientdir opt for label clonezilla in pxelinux config...
Setting clonezilla_mode="full_clonezilla_mode" in /etc/drbl/drbl_deploy.conf and /etc/drbl/drblpush.conf... done!
Debe usar "dcs" -> Clonezilla-start para iniciar el servicio Clonezilla, así saldrá el menú de Clonezilla cuando el cliente inicie
No hidden label Clonezilla-live was found! Skip it.
No hidden menuentry with ID clonezilla-live-client found! Skip it.
*****************************************************.
Adding normal users to group "dialout audio cdrom plugdev floppy video"......... done!
*****************************************************.
Updating the YP/NIS for group...
Nota: Si añade o elimina nuevas cuentas futuras en el servidor DRBL, recuerde ejecutar el siguiente comando otra vez, así algunos grupos (EJ:plugdev) se actualizará:
tune-debian-dev-group-perm -g "dialout audio cdrom plugdev floppy video" -e
Some files are found in /usr/share/drbl//postrun/drbl/. Run them now...
*****************************************************.
Enjoy DRBL!!!
http://drbl.org; http://drbl.nchc.org.tw
NCHC Free Software Labs, Taiwan. http://free.nchc.org.tw
*****************************************************.
Si lo desea, puede reiniciar el servidor DRBL ahora para asegurarse de que todo está listo...(No es necesario, es opcional.).
*****************************************************.
¡El servidor DRBL está preparado! Ahora configure las máquinas cliente para iniciar desde PXE (visite http://drbl.org para mas detalles).
PS. El archivo de configuración se ha salvado como /etc/drbl/drblpush.conf. De todas formas si quiere ejecutar drblpush con la misma configuración otra vez, debe ejecutarlo como: drblpush -c /etc/drbl/drblpush.conf
4) Lanzar la clonación.
Bueno, pues
todos los pasos anteriores se deberían hacer una sola vez y ya queda el entorno preparado para siempre dar soporte de clonación cuando así lo requiramos. Todo lo anterior correspondería mas o menos a los pasos 1-21 descritos en
este manual de Esteban. Ahora el portátil lo usaremos de forma normal (en mi caso es un portátil que usa habitualmente un alumno) y cuando queramos utilizarlo para realizar una clonación multicast haremos simplemente los siguientes pasos de preparación:
- Meter las imágenes de clonación en directorios dentro /home/partimag si no estaban antes. Otra opción es pinchar un dispositivo externo de memoria y hacer que /home/partimage apunte al directorio de las imágenes usando "mount --bind"
- Parar el servicio network-manager para que no interfiera en configuración drbl de la red.
- Configurar la red con las direcciones correctas en eth0 y eth0:0.
- Arrancar el servidor de clonación y responder a sus preguntas básicas sobre la imagen a cargar, el número de equipos a clonar, etc. (pasos 22 a 34 del manual de Esteban). Las respuestas son
* All-elegir todos los clientes
* Elegir Clonezilla-start
* Beginner
* Restore-disk
* No comprobar imagen
* Yo suelo escoger “-p true”, no hacer nada al terminar la clonación
* Elijo imagen que deseo cargar de la lista que sale
* Elijo el disco donde se enviará (normalmente es sda)
* Modo multicast
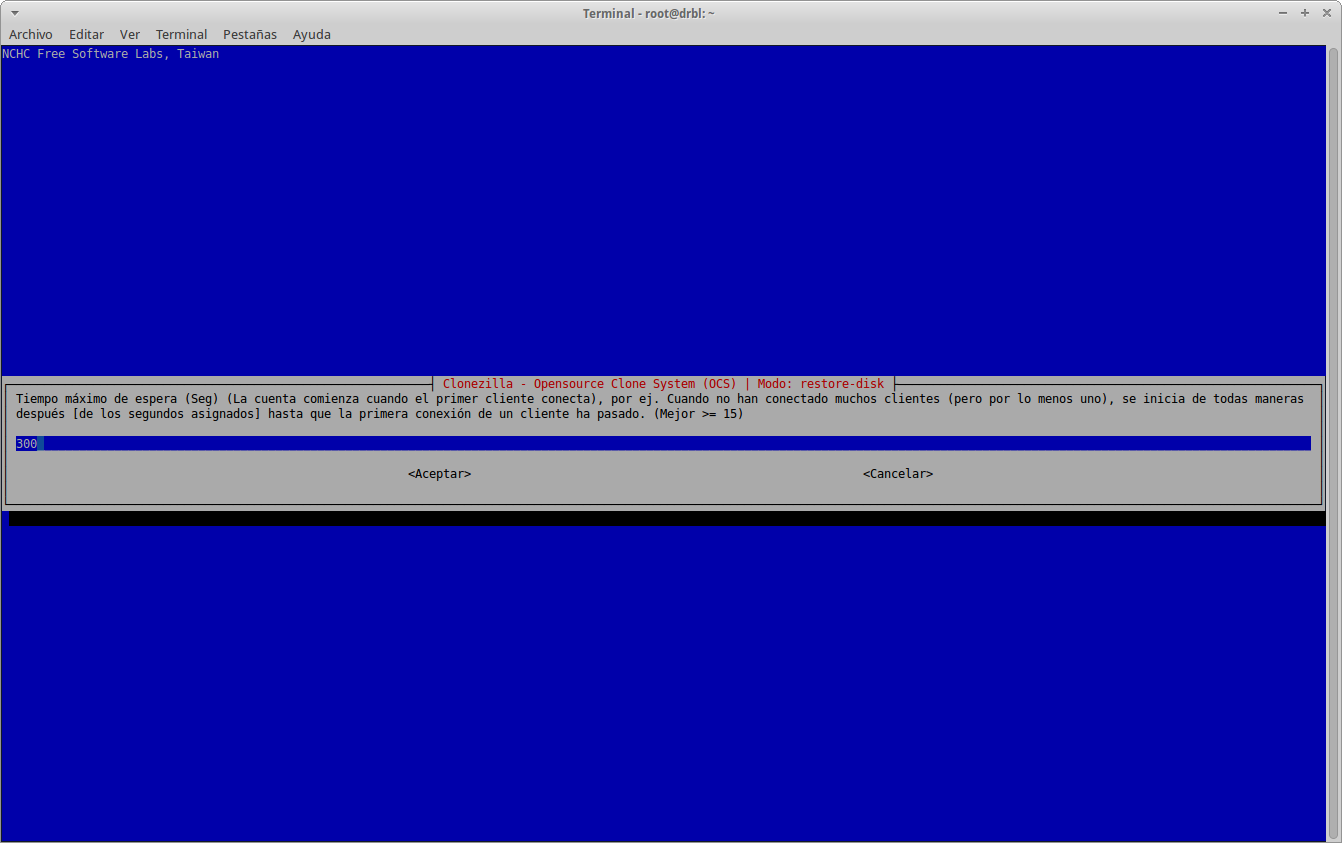
* Modo clients-time-to-wait
* X clientes: número de PC que queremos clonar esta vez
* 300 segundos: 5 minutos como máximo de espera antes de empezar a mandar la imagen y clonar
* ...esperar a que se configure el arranque para los X clientes....
* Cuando vuelve al prompt ya está todo preparado y a la espera de arrancar los clientes.
- Reiniciar los servicios dhcp y tftp para que sirvan las ip y los ficheros de clonación de imágenes (usamos el comando /usr/sbin/drbl-all-service restart, que reinicia todos los servicios). En teoría deberían estar ya levantados, pero hemos apreciado que muchas veces se caen sin motivo antes de empezar.
- Arrancar los clientes y dejar clonar.
Al arrancar los clientes estos cargan el sistema por PXE y empieza la clonación multicast.
Por comodidad y seguridad es aconsejable meter estos pasos anteriores en un script que dejamos en /root/lanza-clonacion.sh. De esta manera se lanzan de un tirón toda la secuencia de órdenes de la parte 4.
# cat /root/lanza-clonacion.sh

#!/bin/bash
service network-manager stop
ifconfig eth0 up
ifconfig eth0 192.168.1.1 netmask 255.255.255.0
ifconfig eth0:0 up
ifconfig eth0:0 192.168.100.254 netmask 255.255.255.0
/usr/sbin/dcs
#Reiniciamos todos los servicios:
/usr/sbin/drbl-all-service restart
#service isc-dhcp-server restart
#service tftpd-hpa restart
exit 0
Tras ejecutar el script y responder a las preguntas vistas antes en las capturas de pantalla sobre que imagen vamos clonar y donde va a ir volvemos al prompt. En ese momento el sistema está esperando a arrancar los clientes con PXE activado para empezar a clonar las imágenes. Incluso la parte de las preguntas (correspondiente a /usr/sbin/dcs) se puede automatizar: el comando /usr/sbin/dcs acepta parámetros para que no haga preguntas, quedando por ejemplo así:
drbl-ocs -b -g auto -e1 auto -e2 -r -x -j2 -sc0 -p poweroff --clients-to-wait 10 --max-time-to-wait 300 -l es_ES.UTF-8 startdisk multicast_restore xubuntu-portatiles-workstation-amd64 sda
De esta manera configuramos DRBL para enviar la imagen llamada "xubuntu-portatiles-workstation-amd64" en el disco sda de 10 portátiles, esperando 300 segundos antes de comenzar la clonación. Podemos hacer un script ad-hoc para ello:
# cat /root/lanza-clonacion-imagen-portatiles.sh

#!/bin/bash
service network-manager stop
ifconfig eth0 up
ifconfig eth0 192.168.1.1 netmask 255.255.255.0
ifconfig eth0:0 up
ifconfig eth0:0 192.168.100.254 netmask 255.255.255.0
drbl-ocs -b -g auto -e1 auto -e2 -r -x -j2 -sc0 -p poweroff --clients-to-wait 10 --max-time-to-wait 300 -l es_ES.UTF-8 startdisk multicast_restore xubuntu-portatiles-workstation-amd64 sda
#Reiniciamos todos los servicios:
/usr/sbin/drbl-all-service restart
#service isc-dhcp-server restart
#service tftpd-hpa restart
exit 0
Con este último script bastaría con preparar el cableado, encender el portátil con entorno DRBL, ejecutar /root/lanza-clonacion-imagen-portatiles-sh, dejar hasta que acabe y vuelva al prompt y finalmente encender uno a uno los clientes a clonar y dejarlos trabajando. Mas rápido imposible.
Nota: aunque no lo he dicho la infraestructura de hardware sería la que propone Esteban: un switch aislado de la red del centro (mejor si no es gestionable, dan menos problemas con el multicast) y conectados a él los portátiles o equipos a clonar, así como el portátil que nos hace de servidor.
5) Mas sencillo todavia.
Si no queremos hacer todos estos pasos tan tediosos, la opción mas rápida es conseguir y meter en un portátil una imagen ad-hoc ya preparada con todos los pasos anteriores, lista para funcionar. Se puede descargar la imagen clonezilla del drbl no live de este
enlace de Mega. Esta imagen incluye a su vez la imagen clonezilla oficial para miniportátiles en /home/partimage/miniportatiles-xubuntu-20072016. Para descargarla desde Mega pide una clave que suministraré a todo aquel que me lo pida por correo.
Tiene gracia, una imagen clonezilla de un sistema para clonar/restaurar imágenes que a su vez contiene otra imagen clonezilla dentro.
A ver si esta vez todo rula mejor y este tema queda estable.